I have kind of been MIA for the last month or so, but those all important life moments have taken over and I have actually been super busy lately. Not to mention more pregnant and tired again...to all you ladies out there trying to do it all (pregnant or not) I give you props it is hard work!!
Busy or not I have been thinking of this post for the last month and am super excited to share my very first wedding cake with you all:

I got the opportunity to try my hand at cake baking for my Sister-in-Law's wedding in Michigan back in June. When first asked to make the cake I was super excited and pretty terrified at the same time! Baking while on vacation, in someone else's space, in hot-humid weather, for an outside wedding I was also standing up in...yeah, that was daunting. The amazing thing about this process was my super supportive family who made sure I felt zero pressure and had all the supplies/space/help/cheerleaders/grilled cheese sandwiches I needed.
Thanks you again guys, you were perfect!
So, anyway back to the task at hand once I said yes to the idea I started my research! The last thing I wanted was a melting, sunken cake that couldn't hold up to the outdoor weather elements. I got a very quick, but thorough, education on proper cake baking and stacking.
Here is my journey:
To start my Mother-in-Law and I decided on a 3 tiered, round cake design that would fit with the rustic, garden theme of the event. Then I got started on the flavor choices, which was the best part! Since my beautiful bride lives on the other side of the United States and she is super easy to please, I took the reins and designed the flavors to please the masses, while personalizing the top tier for the bride and groom.
Below are the linked recipes I used:
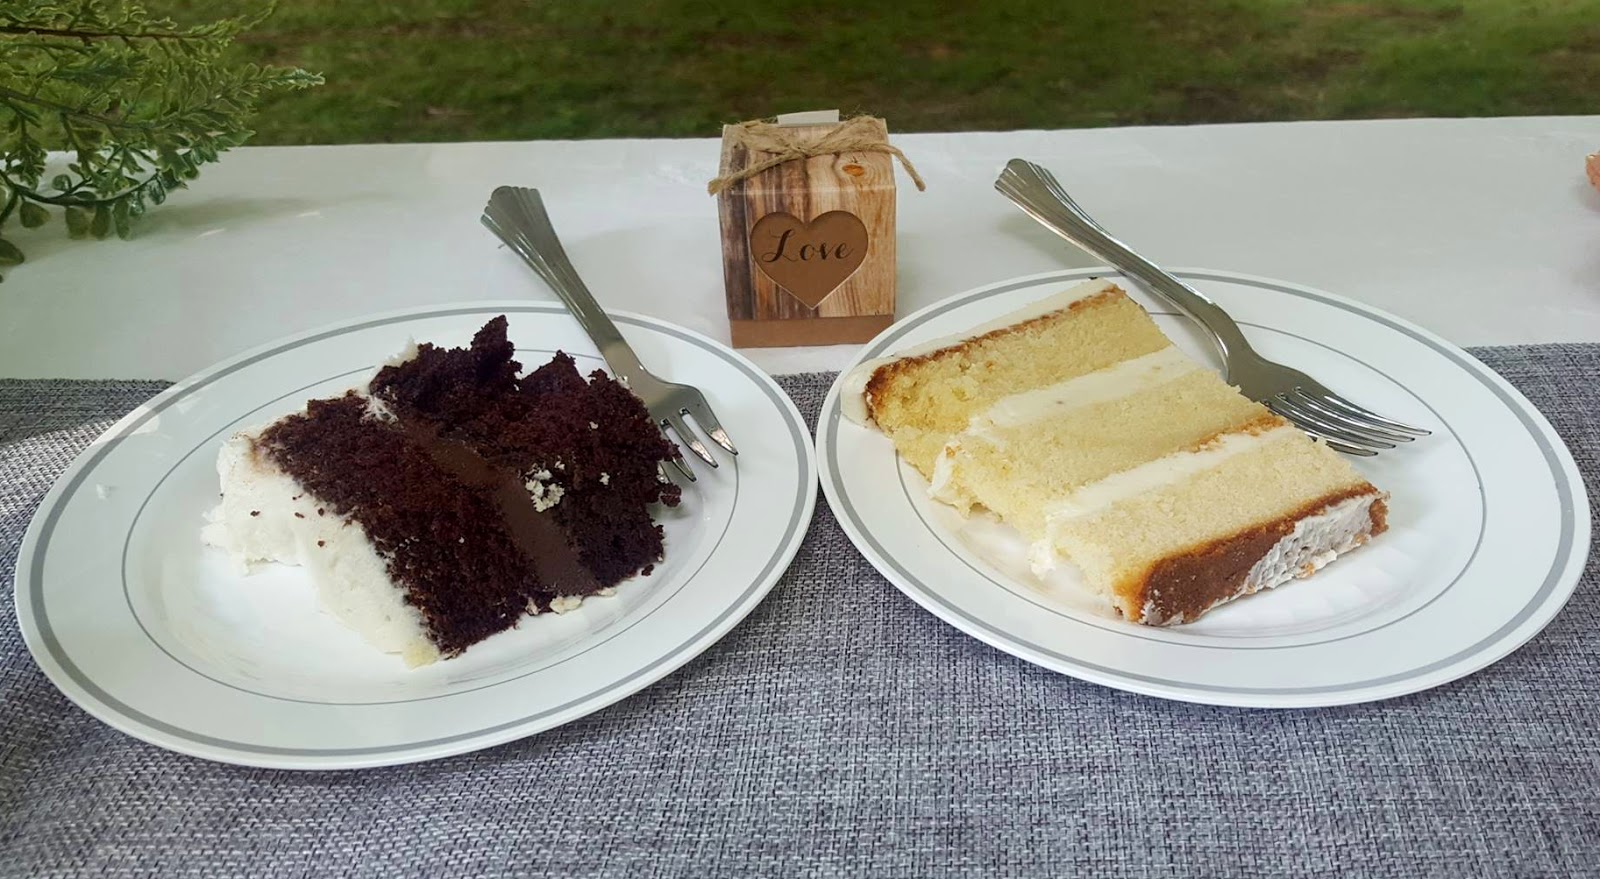
Top Tier: Chocolate Guinness Beer Cake with a Mocha Buttercream filling for the bride and groom's love of all things beer and coffee...I mean what a perfect combination right!?! Let me just say that this was the first time I made the mocha buttercream and honestly it has become my new favorite! The coffee flavor has just the right intensity and pairs perfectly with the bold flavor of this chocolate cake. Seriously, try it you will not be disappointed!
Middle Tier: The {Best} Chocolate Cake with a rich dark chocolate ganache filling. My ganache is so simple it doesn't need it's own link, but it's so good that it probably deserves one...hahaha :)
Dark Chocolate Ganache Recipe:
Bring 1 cup of heavy whipping cream to a slow boil (stirring constantly) remove from heat. Pour over 9 oz dark bittersweet chocolate and whip together until chocolate is fully melted. To set the ganache to be able to use as a filling just refrigerate for 30 minutes. It should be a pudding like consistency.
Bottom Tier: Classic White Wedding Cake with a vanilla buttercream filling.
Classic, moist, delicious!
The exterior of the cake was covered in a crusting vanilla buttercream that held up to the elements perfectly!
**The crusting vanilla buttercream linked above is not the recipe I used, however it is very similar. The truth is I make all my buttercream to taste so I often add more unsalted butter and whipping cream then is called for and I usually only use pure vanilla (no butter flavoring). I highly recommend experimenting with your buttercream flavors once you have the base recipe down. I like my flavors less sweet and more creamy/smoother then most recipes. Mainly, the key to the crusting buttercream is the vegetable shortening in the above recipe. It holds up to heat and it sets in the refrigerator so you can handle your cake without worry of denting it as easily. I also like how this particular recipe makes a large quantity, which of course you'll need for a cake!**
 |
| I like to cool my cakes upside down to flatten the other side. |
Day 1: is messy, so make sure you have enough space to work, you're organized, and you clean as you go...that is a pro tip from my mother :) Furthermore, wrapping each cake tightly in plastic wrap and then placing them to chill in the refrigerator will help lock in the moisture of each cake.
Day 2 (Friday): This was the busiest day: cutting, filling, crumb coating, doweling, and finally decorating each tier.
 |
| Pro tip: bring another shirt, yours will get dirty! And you may loose a button...Thanks Jane! |
Filling: Filling is simple, just add your choice of filling in between your cake layers. Pay special attention to how thick you are filling each layer and that they are evenly filled. I would say mine had about 1/4-1/2 inch of filling to my 1 inch cake layer. Once your layers are filled and stacked back on top of each other use a level (I wrapped mine in plastic wrap to make sure it was clean) and gently press on your cake tiers until level. <-----This step may not seem important, but you'll thank me in the end! Furthermore, I always stack my cakes so the layer that baked on the bottom of the pan is flipped and becomes the top of you cake tier...simply because it is the flattest edge. For the ganache filling I first added vanilla buttercream around the edges then filled with ganache to ensure it didn't run out over the edge of my cake. Next step crumb coat!
 Crumb coating: is simply a thin layer of frosting placed around each cake tier. Crumb coating will make sure your cake crumbs do not show through on your final product. When crumb coating use a separate bowl so that when your cake spatula gets crumbs on it you can still use it for the other tiers and you do not have to waste any frosting. Once you have crumb coated chill your cake in the refrigerator for at least 30 minutes before adding another layer of frosting, this will allow the frosting to harden and become easier to work with. Furthermore, don't worry about your tops or edges at this point because when the frosting is hard you can simply use your knife to cut off and smooth any edges.
  Doweling: After crumb coating I dowelled my layers. This step is SO important and if you do it properly your cakes will not slump, will not fall over, or really even move an inch! Using wooden dowels I purchased at the craft store I simply measured my cake tier (had lots of help cutting them to size) and pushed them down into my cake. 4 (1/4 inch) dowels for my bottom 2 tiers pushed down until they hit cake board and them I used frosting to covers the holes they had made. I then saved 1 (1/2 inch) dowel to place down the center of my cake once it was completely stacked. Your cake boards should have a hole in the middle and if you stack them straight it should be very simple to push the larger dowel right down the middle of your stacked cake.
  Decorating: The best part next to tasting! For this cake we wanted a simple rustic looking design. It almost reminded me of tree bark and was super simple to accomplish. I added my frosting, probably about 1/4-1/2 inch all the way around the cake, making sure it was pretty even to the cake board. Lucky, with this design I didn't have to make sure my frosting or edges were super smooth. I then used my cake spatula to lightly mark the cake all the way around each layer. I was trying to make the movements random and look more natural instead of planning out every move. This design was really simple and fit it with the event perfectly! Once done it was back in the refrigerator to chill over night.
Day 3 (Saturday: Wedding Day): I chose to transport my cakes before stacking them, simply because I had about a 40 minute drive to the wedding location and was transporting the cakes alone. So, for this process I cut down 2 large boxes and gently placed each layer inside. To ensure they didn't move in the boxes I placed tin foil down in each box and added a nice smear of buttercream to the tin foil, as well as, each cake board...this process acts like glue to stick your cakes down, just like when you place them on your cake board to start. I had an awesome helper who packed the cakes tightly in the back of the vehicle and they didn't move an inch during my drive!
And seriously Michigan you have my heart, but your roads suck!!
 |
| Picture courtesy of PINKCAKEBOX.COM |
Once I made it to the wedding venue I had a nice air conditioned camper to work in (Thanks Carl and Heather). This is where I stacked the cake using a large spatula to gently place each layer down. Once stacked, I made sure each layer was centered and I used a plastic wrapped level to make sure the entire cake was level prior to adding the final dowel. Once perfectly centered and leveled I used my largest dowel to place through the center of the cake all the way to the bottom tier...that baby was now locked in place!!
The final step was finishing up the decorations including hiding each tier's edge, adding beautiful recycled paper flowers (are not these the coolest things), and adding the super, sweet cake topper.
VOILA: Completion!
And super simple right...


So, to wrap up I have to say thank you again to everyone who helped me with this creation! I love you all so much! It was a lot of work, but well worth it!
Thanks Penny (MIL) and Scott (Hubby) for believing in me from the start and thanks Haley (SIL) for talking me down from the ledge a few times!
Matt and Michelle your special day was amazing; thank you for letting me be a part of it in such a special way! I will cherish all the memories for a life time and of course I am not only talking about the cake ones :D


